
Showing posts with label Images. Show all posts
Showing posts with label Images. Show all posts
Sunday, April 10, 2011
cafebara
Today's coffee print .. looks enough like a capybara to call it cafebara. Am quite happy with it.


Monday, February 14, 2011

Saturday, February 05, 2011
Happy New Year of the Rabbit

In 2004 I created multiple versions of a card with a rabbit on it .. the background changed in the versions, but not the rabbit. I love the rabbit and this background works best.
You can buy this image as a greeting card or print at imagekind.com
Happy New Year of the Rabbit.
If you're looking for your Chinese Astrology sign and forecast for 2011 check moonslipper.com. I'm a tiger and according to moonslipper 2011 will be a positive year for tigers.. yay!
Wednesday, June 24, 2009


Saturday, November 22, 2008

Sunday, June 01, 2008

Sunday, May 25, 2008
random coffee print
Ok, so it's been a while since I've posted anything, but I have a good reason! I started a new job and have been busy! I'll post more about that later and when I can link to something interesting for you to see, er well interact with ... (how's that for mystery!). Anyhow, here is a little randomly "generated" image from this morning's coffee ... I LOVE these images, as much as I lOVE coffee!


Monday, July 30, 2007
Jubeela photos
I was backing up and cleaning my systems the other day and I found a few photos I had prepared for Aniboom last winter. I don't think they ever posted them, so here they are:


Wednesday, May 30, 2007
h264 rocks
Wow. Today I was preparing files to take to a sound engineer who has agreed to critique my sound mix. He recommended that I bring the film as a QuickTime H264 movie and the final mix on a data CD. When I first exported the H264 movie using the default settings, the file size was huge, so I reduced the bit rate in half, thinking there would be a reduction in quality. and being a bit apprehensive because of the amount of time it takes to export the movie. Well I was wrong about the quality and it was certainly worth the 2 hour export time. I now have a 1280x720 QuickTime H264 that weighs in at 265 mb, that looks beautiful (and the mix sounds pretty good too -- but that is really for my sound engineer to judge ;o).
I've also been preparing the documentation and promo stuff for festivals and looking at the various festivals in which to enter the film. It feels like an uphill battle because it will be rejected from most -- in fact this is the statistic -- most films only make it into 25% of festivals they are submitted to. Knowing that it was rejected 5 times from funding agencies isn't helping my motivation right now. Reading all the rules and figuring out the deadlines and whether I can afford the projection format requirement they want and the publicity materials ... ughh it's a bit overwhelming. I'm hoping that once I get a complete package done, it will only be a matter of duplicating it. Next up is to create media screeners and a poster.
Anyhow, I have lovely DVD covers and labels waiting to be affixed to the DVDs. Here is a postcard that I'm working on:

_
I've also been preparing the documentation and promo stuff for festivals and looking at the various festivals in which to enter the film. It feels like an uphill battle because it will be rejected from most -- in fact this is the statistic -- most films only make it into 25% of festivals they are submitted to. Knowing that it was rejected 5 times from funding agencies isn't helping my motivation right now. Reading all the rules and figuring out the deadlines and whether I can afford the projection format requirement they want and the publicity materials ... ughh it's a bit overwhelming. I'm hoping that once I get a complete package done, it will only be a matter of duplicating it. Next up is to create media screeners and a poster.
Anyhow, I have lovely DVD covers and labels waiting to be affixed to the DVDs. Here is a postcard that I'm working on:

_
Wednesday, May 23, 2007
testing the DVD
I made a first test DVD last night and made fixes to the DVD menus today. I've tested the sound mix on a few different systems in house, but still need to go to a sound studio and have a professional check my levels. Then I can go to the video house and have the digiBeta and betaSP tapes made. I'm only going to make NTSC tapes for now (unless the Video house convinces me that it would be more cost effective to do PAL at the same time -- we'll see).
The Festival de Nouveau Cinema requires subtitles in French and I'm not sure what the best way is to do that. I started to add them in Final Cut Pro, but I stopped myself and got back on my priorities (the FNC deadline is June 15th so I have time to decide what to do). An option other than subtitles in FCP might be to record a French dialogue track and have the Video house make a digiBeta with the French sound track, of course then they might want English subtitles. I'll need to check the rules again. In the meantime, I can always translate the dialogue into French.
I had wanted to animate the end credits, but I've left them with still images. I think it'll be ok. I've just gotta get this thing out the door.
Here are a few screen shots to wet your appetite:
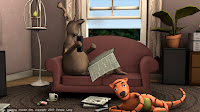
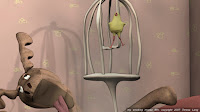
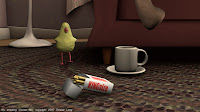
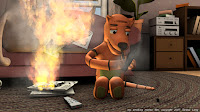
The Festival de Nouveau Cinema requires subtitles in French and I'm not sure what the best way is to do that. I started to add them in Final Cut Pro, but I stopped myself and got back on my priorities (the FNC deadline is June 15th so I have time to decide what to do). An option other than subtitles in FCP might be to record a French dialogue track and have the Video house make a digiBeta with the French sound track, of course then they might want English subtitles. I'll need to check the rules again. In the meantime, I can always translate the dialogue into French.
I had wanted to animate the end credits, but I've left them with still images. I think it'll be ok. I've just gotta get this thing out the door.
Here are a few screen shots to wet your appetite:


Monday, April 02, 2007
Fxtree: Composite node: Output Size Mode
After transforming effects to use through a composite node (over or math), you can easily crop to the background by setting the Output size node to Use Default Image on the Output tab.
I had been using the psd blend addon but have stopped using it as the "Place Output Image at Origin" is not working consistently and my attempts to use the Output Size Node parameter don't work with the psd blend node. This is unfortunate since the psd blend addon has more compositing options than the math composite (or perhaps they are just easier for me to use as I am used to photoshop).
As promised here is snapshot of the current state of scene 3's fxtree. It is crazy, but it is almost working! I'm having trouble matting some things, I've been attempting to reuse passes into the matte connection of composite nodes and while this is working in most cases, its not working for the fire. I'll need to render a matte for the tiger and canary for the frames when they are in front of the fire.

I had been using the psd blend addon but have stopped using it as the "Place Output Image at Origin" is not working consistently and my attempts to use the Output Size Node parameter don't work with the psd blend node. This is unfortunate since the psd blend addon has more compositing options than the math composite (or perhaps they are just easier for me to use as I am used to photoshop).
As promised here is snapshot of the current state of scene 3's fxtree. It is crazy, but it is almost working! I'm having trouble matting some things, I've been attempting to reuse passes into the matte connection of composite nodes and while this is working in most cases, its not working for the fire. I'll need to render a matte for the tiger and canary for the frames when they are in front of the fire.

Thursday, March 29, 2007
promo image of the moose

Ok, so the film isn't available on DVD yet, but it will be soooooo soooooon ;o)
Thursday, February 22, 2007
happy new year of the golden pig

Another new year to celebrate!
There are no golden pigs in my smoking moose film, which is, still in-progress. It's moved into the compositing stage, although I still have FX passes to render for the huge scene 3, I'm trying to get the rendering and compositing of the room and characters done and then I'll add the Smoke, Fire and Water passes.
Tuesday, December 26, 2006
another year over, a new one on the way!

Happy Holidays!
Film Update:
I've stopped rendering the film in order to work on my demo reel. I'm looking for a job as an animator (using XSI in preference ;o). If anyone knows of an opportunity please email me : tiger at smokingmoose dot com.
Tuesday, September 19, 2006
my smoking moose film teaser
The film is being rendered ... it's gonna take a while. It took me a long time to get the settings right and the passes right. I almost have a complete version of the film at a small resolution, that I can use to finish the sound edit and the music while the film renders at full resolution.


Friday, December 23, 2005

Monday, October 24, 2005
Create a Skeleton Rig from the Biped Guide
Using a guide to create a rig speeds up the process of building skeletons.
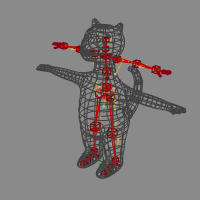
1. Start by loading the model you want to rig.
2. Get the Biped Guide (Animate > Create > Character> Biped Guide).
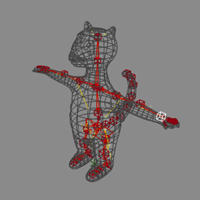
3. Translate the cubes to best fit the skeleton into the model.
4. Duplicate the spine cube (at least 3 or more times) to create a tail. (Or create the tail or other additional bones after you've generated the rig from the guide).
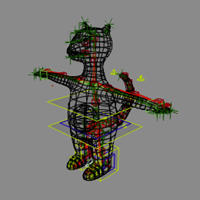 5. Select the guide and generate the rig from the guide (Animate > Create > Character > Rig from Biped Guide. Choose Quaternion for the spine, but skeleton for the neck. I find that non-symmetrical manipulation of arms works better (i.e. both arms have positive scaling).
6. Add bones as necessary. I use 3 bone arms (the extra bone works as the elbow). I also use an upper jaw bone, that makes enveloping the head a bit easy and is a good holder (parent) for the eye and eyebrow nulls.
There are a few things to avoid when transforming the guide:
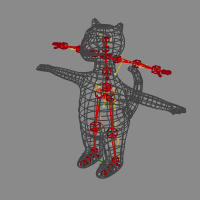
1. Start by loading the model you want to rig.
2. Get the Biped Guide (Animate > Create > Character> Biped Guide).
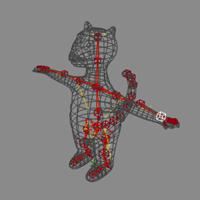
3. Translate the cubes to best fit the skeleton into the model.
4. Duplicate the spine cube (at least 3 or more times) to create a tail. (Or create the tail or other additional bones after you've generated the rig from the guide).
 5. Select the guide and generate the rig from the guide (Animate > Create > Character > Rig from Biped Guide. Choose Quaternion for the spine, but skeleton for the neck. I find that non-symmetrical manipulation of arms works better (i.e. both arms have positive scaling).
6. Add bones as necessary. I use 3 bone arms (the extra bone works as the elbow). I also use an upper jaw bone, that makes enveloping the head a bit easy and is a good holder (parent) for the eye and eyebrow nulls.
There are a few things to avoid when transforming the guide:
- Don't move the ribcage start cube in front of the rib cage end cube;
- Don't delete bones in the guide, wait until after you've created the rig and then delete them in rig;
Monday, October 17, 2005
modeling a character from a sphere
How to make a character from a sphere:
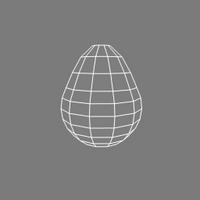
1. Get a polygonal sphere and increase the subdivisions to 12, 12
2. Translate components (points, edges or polygons) to give it an egg like shape
3. Select the top polygons and delete them
4. Freeze the sphere and duplicate it to make the head
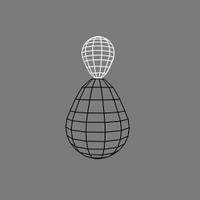
5. Rotate, translate and scale the duplicate above the body
6. Select the bottom row of points and scale them so the neck part of the head matches the neck part of the body.
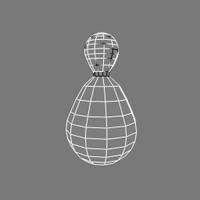
7. Select both the head and the body and choose, Create > polymesh > blend, to merge the head and the body into one object, > toggle off blend, this will merge the points along the neck seam.
8. Select the polymsh and freeze modeling, you might want to rename the object to something more intuitiven than polymsh.
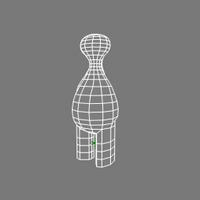 Add the legs, feet, arms, snout, ears
9. Select polygons on the bottom of the body where the body parts will be attached.
10. Extrude along axis, increase the length and the subdivisions to make the body parts.
11. Transform the components as necessary (i.e. translate, scale and rotate, points, edges or polygons to better shape the body parts).
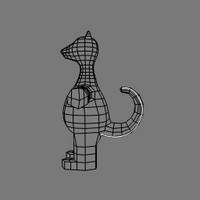 Add the tail
12. Draw a curve in the shape of the tail
13. Select polygons on the body where the tail will extend from
14. Extrude along curve, pick the curve, increase the subdivisions, decrease the scale per subdivision, toggle on AutoRotate
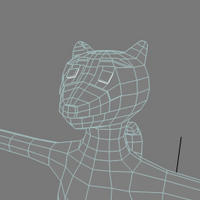 Add the eyes, nose and stripes
15. Select the polygons where the eyes, nose and stripes will appear and extrude them. In these cases the length will be very small.
16. Select the edges along the border of the eyes, nose and stripes and choose Modify > Component > Set Edge Crease Value, increase the value. This makes the nose, eyes or stripe look more like a blob of plasticine added to the model.
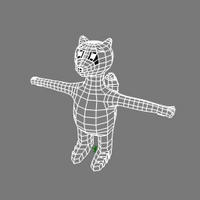 Colour the eyes, nose, stripes and paws
17. Select the polygons that make up the eyes, nose, stripes and paws and create clusters from them.
18. Select the clusters and apply materials to them.
19. Use the + key to increase the subdivisions.
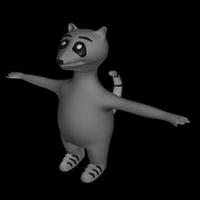
20. Switch to shaded view to double check the result.

1. Get a polygonal sphere and increase the subdivisions to 12, 12
2. Translate components (points, edges or polygons) to give it an egg like shape
3. Select the top polygons and delete them
4. Freeze the sphere and duplicate it to make the head

5. Rotate, translate and scale the duplicate above the body
6. Select the bottom row of points and scale them so the neck part of the head matches the neck part of the body.
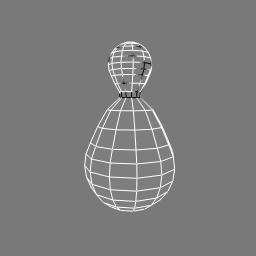
7. Select both the head and the body and choose, Create > polymesh > blend, to merge the head and the body into one object, > toggle off blend, this will merge the points along the neck seam.
8. Select the polymsh and freeze modeling, you might want to rename the object to something more intuitiven than polymsh.
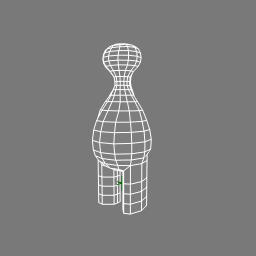 Add the legs, feet, arms, snout, ears
9. Select polygons on the bottom of the body where the body parts will be attached.
10. Extrude along axis, increase the length and the subdivisions to make the body parts.
11. Transform the components as necessary (i.e. translate, scale and rotate, points, edges or polygons to better shape the body parts).
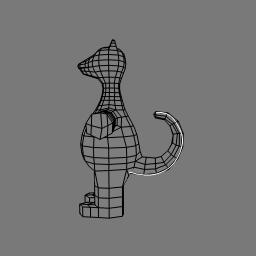 Add the tail
12. Draw a curve in the shape of the tail
13. Select polygons on the body where the tail will extend from
14. Extrude along curve, pick the curve, increase the subdivisions, decrease the scale per subdivision, toggle on AutoRotate
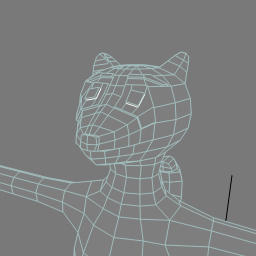 Add the eyes, nose and stripes
15. Select the polygons where the eyes, nose and stripes will appear and extrude them. In these cases the length will be very small.
16. Select the edges along the border of the eyes, nose and stripes and choose Modify > Component > Set Edge Crease Value, increase the value. This makes the nose, eyes or stripe look more like a blob of plasticine added to the model.
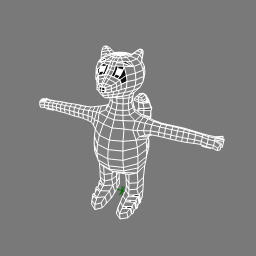 Colour the eyes, nose, stripes and paws
17. Select the polygons that make up the eyes, nose, stripes and paws and create clusters from them.
18. Select the clusters and apply materials to them.
19. Use the + key to increase the subdivisions.

20. Switch to shaded view to double check the result.
Wednesday, August 31, 2005
Adding deformers to transformed envelopes
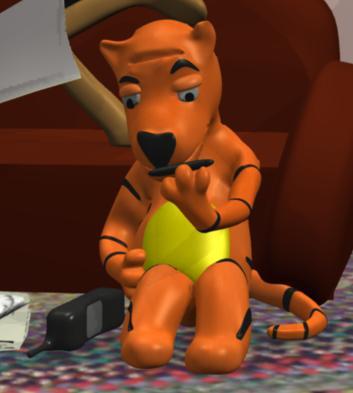
Yikes. I wanted to add 3 nulls to the Tiger's skeleton so I could animate his nostrils when he sniffs his stripe. When I assigned the nostrils' points to the added deformer nulls the points shot off into the distance.
A search on the xsi discussion group on softimage.com confirmed the issue was related to the reference pose and it having been transformed. There are a few different workarounds listed in the postings. Here is a new variation that worked for me.
1.  From the Weight Editor ppg, save the envelope
2.  Select the points you want to assign to the new deformer and assign them to any OTHER deformer
3.  Select the Envelope Operator and Freeze
4.  Select the envelope geometry and set envelope
5.  Load the saved preset.
Thursday, August 04, 2005
object to cluster constraint woes - Skeleton/Envelope Joy
Last night I was struggling with yet another object to cluster constraint. Problems start to happen when I need to change the position / orientation of the object .. i.e. when the moose dies, the cigarette in his mouth (which is constrained to a cluster on his tongue) rolls off the tongue and onto the newspaper. Animating the blend or the activeness of the constraint works (in that it blends or turns it on or off) but I can't get the position and orientation correct, there is always a jump, or I can't place the thing in the place where I want it to be.
This was also happening with with the nose and eyebrows of the tiger (and the moose too). For these, I added polygons to the polygonal object and used crease control. This wouldn't work for the cigarette, it couldn't really be part of the tongue and it needs to roll off it.
I had the same problem with the stripe on the forehead of the tiger, which I solved by adding a 2 bone skeleton chain and enveloping the stripe to the two bones. In this case, this is the perfect solution since the stripe needs to bend when the tiger pulls it off and then needs to be straightened out when he sniffs it.
Yesterday, I also used this chain and envelope technique for the Canary's cigarette, which previously had been constrained to a cluster with which I was struggling with the offsets to get the correct orientation and position of the cigarette when the canary picks it out of the package. This is a great solution here, since I can now animate the length of the second bone of the cigarette as it is smoked.
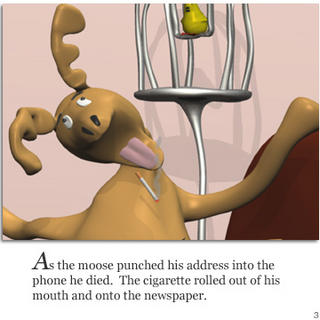
I decided today to use the same Chain and Envelope technique for the Moose's cigarette. It works marvelously. It is so much easier to control the position and orientation of the cigarette just by animating the root of the skeleton. The chain and envelope are children of the tongue and move perfectly with it as the moose chokes to death.
I'm sure there is no problem with the object to cluster constraint in itself. The problems occur when I try to animate offsets / activeness / blend. I'm happy that skeletons and envelopes are working fine for these situations!
This was also happening with with the nose and eyebrows of the tiger (and the moose too). For these, I added polygons to the polygonal object and used crease control. This wouldn't work for the cigarette, it couldn't really be part of the tongue and it needs to roll off it.
I had the same problem with the stripe on the forehead of the tiger, which I solved by adding a 2 bone skeleton chain and enveloping the stripe to the two bones. In this case, this is the perfect solution since the stripe needs to bend when the tiger pulls it off and then needs to be straightened out when he sniffs it.
Yesterday, I also used this chain and envelope technique for the Canary's cigarette, which previously had been constrained to a cluster with which I was struggling with the offsets to get the correct orientation and position of the cigarette when the canary picks it out of the package. This is a great solution here, since I can now animate the length of the second bone of the cigarette as it is smoked.
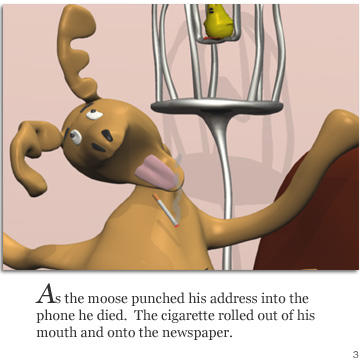
I decided today to use the same Chain and Envelope technique for the Moose's cigarette. It works marvelously. It is so much easier to control the position and orientation of the cigarette just by animating the root of the skeleton. The chain and envelope are children of the tongue and move perfectly with it as the moose chokes to death.
I'm sure there is no problem with the object to cluster constraint in itself. The problems occur when I try to animate offsets / activeness / blend. I'm happy that skeletons and envelopes are working fine for these situations!
Subscribe to:
Posts (Atom)


