Here's my entry to January's Strut your reel animation contest.
The animation was the easy part! The sync is a bit off on YouTube which I am blaming on the conversion process. The first version I uploaded was completely out-of-sync, I believe because I had animated it at 24 fps. I switched to 29.97 and then to 30 fps and it is better, but after uploading many different versions of 30 fps I realized that I could upload the same clip but the sync would be a bit different after the conversion. That said, the best results seemed to be with: 30fps source, converting the sound to mp3, exporting a .mp4 file using the MPEG-4 Codec (although uploading the same clip twice still resulted in slightly different audio synchronisation).
You can see all the entries at strutyourreel
Wednesday, January 31, 2007

Friday, January 12, 2007
fcurve madness
When fixing animation always remember to double check fcurves. Two things have recently driven me mad!
(a) on curves using spline interpolation if 2 keyframes are of the same value make sure that you use plateau slopes so that the value between the 2 keyframes does not exceed the 2 keyframes;
(b) if you retime animation make sure that there are no keyframes that are not on frames -- this can be achieved by selecting the keyframes and choosing "move keys to nearest frames". However, this may not work IF there is already a keyframe on the nearest frame and you may end up with a keyframe immediately before or after... if you're working in the dopesheet you won't see this stray keyframe
So the lesson of the day is, if you have movement where you don't expect there to be movement, double check the fcurves for the slope between frames and for extra keys between frames.
(a) on curves using spline interpolation if 2 keyframes are of the same value make sure that you use plateau slopes so that the value between the 2 keyframes does not exceed the 2 keyframes;
(b) if you retime animation make sure that there are no keyframes that are not on frames -- this can be achieved by selecting the keyframes and choosing "move keys to nearest frames". However, this may not work IF there is already a keyframe on the nearest frame and you may end up with a keyframe immediately before or after... if you're working in the dopesheet you won't see this stray keyframe
So the lesson of the day is, if you have movement where you don't expect there to be movement, double check the fcurves for the slope between frames and for extra keys between frames.
Thursday, January 04, 2007
RGBA Matte Pass - override ignored if color correction node exists in render tree
One of the comments I received regarding the film was that the carpet didn't have enough resolution. I was simply using a low res texture of a braided rug and had become used to it. Since I didn't have a high res texture I've been testing various methods of creating a higher resolution carpet and have tried a number of different ways (including modeling the braid and using skeletons to wrap it into a rug -- which was way too big of a model to actually use and didn't end up looking that good ;o). I also tried painting a photoshop image (with painted bump map) -- this method looked great in the small tests that I did but when I made the large final rug -- it didn't look so great. Finally I ended up using the fabric procedural shader and after lots of tweaking I have something that I think is acceptable, although I have to give up on the braided rag rug look and accept a rug look.
Now that I've got the rug geometry I thought I could just render it in a RGBA matte pass and composite it into the other renders. However, when I made the matte pass (using the preset) -- the characters appeared in the render in full RGB - while the rest of the objects were as expected rendered in black.
After a bit of searching I discovered that this was being caused by having extra nodes in the render trees -- on 2 of the characters I had a color correction and on another I had a intensity change. Removing these and recreating the pass gives me the pass as I would like it to be. However, this will cause a problem when/if I need to re-render any of the characters as they will no longer match the other frames.
For scenes 1 and 2, since I need to re-render the beauty pass anyway, I'll just add the new carpet to the beauty pass. Scene 3 will be a bit more of a problem.
I'm still using XSI 4.2 so this is possibly fixed in a more recent version.
Now that I've got the rug geometry I thought I could just render it in a RGBA matte pass and composite it into the other renders. However, when I made the matte pass (using the preset) -- the characters appeared in the render in full RGB - while the rest of the objects were as expected rendered in black.
After a bit of searching I discovered that this was being caused by having extra nodes in the render trees -- on 2 of the characters I had a color correction and on another I had a intensity change. Removing these and recreating the pass gives me the pass as I would like it to be. However, this will cause a problem when/if I need to re-render any of the characters as they will no longer match the other frames.
For scenes 1 and 2, since I need to re-render the beauty pass anyway, I'll just add the new carpet to the beauty pass. Scene 3 will be a bit more of a problem.
I'm still using XSI 4.2 so this is possibly fixed in a more recent version.
Tuesday, December 26, 2006
another year over, a new one on the way!

Happy Holidays!
Film Update:
I've stopped rendering the film in order to work on my demo reel. I'm looking for a job as an animator (using XSI in preference ;o). If anyone knows of an opportunity please email me : tiger at smokingmoose dot com.
Sunday, December 03, 2006
tweaking final gathering settings
My small render (250x141) is completed and composited, sent out for feedback and feedback received. Between the time I sent it out and received feedback I started the final res render (1280x720) and discovered to my horror that the final gathering pass was taking up to 23 minutes a frame to render. I went back in to the render settings to tweak them.
Here is a resume what Dave Lajoie wrote in a pdf about final gather settings (I think the pdf is from XSI 3.0 release -- some of the settings are no longer named the same -- you can get it here) :
"So to recap on FG accuracy and radius, [...] here are the different combinations and permutations:
• When Radius is small (0.01-0.2) and Accuracy is high (1000-3000), the render speed is the slowest but the render quality is the best. Usually these settings are suggested to remove FG flickering. Since each frame contains a lot of FG samples, it is suggested that you rebuild the FG map at each frame. Otherwise the FG map file will grow too rapidly and the renderer will run out of memory.
• When Radius is Large (1-100) and Accuracy is High (1000-3000), render speed is a little faster. This combination is perfect for smoothing out the FG result, giving the rendered image a more blurry effect. Again it is suggested that you rebuild the FG map at each frame since the FG accuracy is high.
• When the Radius is small (0.01-0.2) and Accuracy is low (100-500), the FG result is poor. I suggest that you use this combination only for preview purposes.
• Lastly, when the Radius is large (1-100) and Accuracy is low (100-500), the FG settings are ideal for an Image based lighting pass, as long as the image used for the lighting pass doesn’t contain too much high frequency detail. It is strongly suggested that you blur the image that you use for the image based lighting pass, since this allows you to use low Accuracy and a large Radius, which will, in turn, save precious rendering time.
Very important to remember:
If Radius is small, Accuracy needs to be high.
If Radius is large, Accuracy can be lowered."
For my smoking moose purposes I chose the 4th option - large radius and low accuracy using image based lighting. The min radius is set to 20, the max to 50, the accuracy is set to 100 and the filter is set to 1. I'm using a constant image for the image based lighting pass as well as a few constant color cards to bounce rays off. Since I'm also rendering a dirtmap pass I can get away with the larger radius and lower accuracy.
Also, Dave's pdf mentioned that high frequency textures should use lower radius and higher accuracy -- the braided rag rug is a very high frequency texture -- this could explain the high render times. So I used a trick mentioned in the pdf:
"Another trick which can save a lot of time is to use a ray_type shader, which allows you to use two different rendertrees, one for camera rays and one for Final Gathering rays. With this approach you can use a simpler rendertree to remove high frequency from the surrounding object’s surface."
The FG render pass is down to 2 to 6 minutes per frame! Of course the other passes also take time, so the total combined render time is higher than 6 minutes, but it's still a lot less than if I had continued rendering the FG pass with low radius and high accuracy!
The "rebuild" options refer to the Final Gathering Map and have changed since the pdf was written. I'm using XSI 4.2 and the options I have are:
Thanks to Dave wherever you are!.
Now on to fixing some of the stuff I received feedback on.
Here is a resume what Dave Lajoie wrote in a pdf about final gather settings (I think the pdf is from XSI 3.0 release -- some of the settings are no longer named the same -- you can get it here) :
"So to recap on FG accuracy and radius, [...] here are the different combinations and permutations:
• When Radius is small (0.01-0.2) and Accuracy is high (1000-3000), the render speed is the slowest but the render quality is the best. Usually these settings are suggested to remove FG flickering. Since each frame contains a lot of FG samples, it is suggested that you rebuild the FG map at each frame. Otherwise the FG map file will grow too rapidly and the renderer will run out of memory.
• When Radius is Large (1-100) and Accuracy is High (1000-3000), render speed is a little faster. This combination is perfect for smoothing out the FG result, giving the rendered image a more blurry effect. Again it is suggested that you rebuild the FG map at each frame since the FG accuracy is high.
• When the Radius is small (0.01-0.2) and Accuracy is low (100-500), the FG result is poor. I suggest that you use this combination only for preview purposes.
• Lastly, when the Radius is large (1-100) and Accuracy is low (100-500), the FG settings are ideal for an Image based lighting pass, as long as the image used for the lighting pass doesn’t contain too much high frequency detail. It is strongly suggested that you blur the image that you use for the image based lighting pass, since this allows you to use low Accuracy and a large Radius, which will, in turn, save precious rendering time.
Very important to remember:
If Radius is small, Accuracy needs to be high.
If Radius is large, Accuracy can be lowered."
For my smoking moose purposes I chose the 4th option - large radius and low accuracy using image based lighting. The min radius is set to 20, the max to 50, the accuracy is set to 100 and the filter is set to 1. I'm using a constant image for the image based lighting pass as well as a few constant color cards to bounce rays off. Since I'm also rendering a dirtmap pass I can get away with the larger radius and lower accuracy.
Also, Dave's pdf mentioned that high frequency textures should use lower radius and higher accuracy -- the braided rag rug is a very high frequency texture -- this could explain the high render times. So I used a trick mentioned in the pdf:
"Another trick which can save a lot of time is to use a ray_type shader, which allows you to use two different rendertrees, one for camera rays and one for Final Gathering rays. With this approach you can use a simpler rendertree to remove high frequency from the surrounding object’s surface."
The FG render pass is down to 2 to 6 minutes per frame! Of course the other passes also take time, so the total combined render time is higher than 6 minutes, but it's still a lot less than if I had continued rendering the FG pass with low radius and high accuracy!
The "rebuild" options refer to the Final Gathering Map and have changed since the pdf was written. I'm using XSI 4.2 and the options I have are:
- Overwrite
- Append
- Generate
Thanks to Dave wherever you are!.
Now on to fixing some of the stuff I received feedback on.
Thursday, November 23, 2006
clouds, emitters and partitions
Although it is possible to have more than one emitter per particle cloud, it might not be a good idea if you need to separate the emitters into different passes. It is the cloud that matters in the partition, so even if an emitter is not in the partition the emission from it may still appear in the render because the cloud that it belongs to is in the partition.
rig from guide and remove all animation any type do not mix
Here is something to remember if you are using Rigs from Guides. These rigs use Scripted Operators to control the upvector - the scripted operator (as well as any constraints or expressions) will be removed if you use the Remove Animation > from All Parameters, Any
Animation Type command from the Animation panel. Which will result in the rig no longer behaving as expected - i.e. if you use the Remove all animation command and then try to rotate the chest, the upperbody will not follow.
I was not able to recreate the scripted operator and had to regenerate the rig from the guide.
To avoid this, only remove animation from the specific transform (position or rotation) rather than all!
Animation Type command from the Animation panel. Which will result in the rig no longer behaving as expected - i.e. if you use the Remove all animation command and then try to rotate the chest, the upperbody will not follow.
I was not able to recreate the scripted operator and had to regenerate the rig from the guide.
To avoid this, only remove animation from the specific transform (position or rotation) rather than all!
Tuesday, September 19, 2006
my smoking moose film teaser
The film is being rendered ... it's gonna take a while. It took me a long time to get the settings right and the passes right. I almost have a complete version of the film at a small resolution, that I can use to finish the sound edit and the music while the film renders at full resolution.


Friday, August 18, 2006
Painting is easy ...
"Painting is easy when you don't know how, but very difficult when you do."
Edgar Degas
Edgar Degas
Sunday, May 14, 2006
Why re-using a ptype may not give the same color results as the original
Remember that lighting affects the look of your particles, so if you are reusing a ptype with different lighting, it may look completely different. If you are doing this in the same scene and the emission is just not in the same position as the original, you can add an exclusive light to that particle cloud so that it can look the same as the other, but the rest of your scene won't be affected by the additional light.
Sunday, April 23, 2006
animate particle color at frame 1 if you're using age% as the animation reference
This is probably obvious if you think about it, but since I just spent a couple of hours trying to figure out why my particles were rendering grey and not the animated colors I had set, I figure it's worth blogging. If you are using age% animation reference for the particle color, make sure the colors are animated at frame 1. Otherwise depending on what frame you are animating the emission at you may only get the last color of color animation.
Sunday, March 19, 2006
texture editor + extended component selection mode don't mix
Here's a tip when working in the Texture Editor. If you like to work with extended component selection mode turned on, you should turn it off when working in the Texture Editor. When it is on, it keeps adding to the selection so that when you are manipulating sample points you may actually be manipulating many more points than you are aware. So if points on what you believe to be unselected clusters seem to be moving, check to make sure that extended component selection is turned off!
Sunday, March 12, 2006
displacements
... something to remember when applying a displacement - increase the subdivision on the object to see the "real" effect, otherwise what you see in the render region will not be as defined as you expect it to be.
Sunday, March 05, 2006
more smoking
The volume shader didn't work out on the moose's moving cigarette... it looks great on a static object but looks strange on a moving object. I've reverted back to using particles. I've got a decent looking smoke emitting from the cigarette ash, using the beam type for the shape. I've added a vortex (child of the ash) to give the stream a bit of variety. It doesn't look convincing on a static frame but it does look pretty good in movement.
For the exhaling smoke, I've setup events to billow the smoke and have gravity, turbulence and vortex affecting the particles.
For the exhaling smoke, I've setup events to billow the smoke and have gravity, turbulence and vortex affecting the particles.
Monday, February 27, 2006
smokin
Lately, I've been spending most of my smoking moose time working on the smoke effects. Currently focusing on making the moose smoke his cigarette. I've analyzed cigarette smoking videos and films (from getty images and from some DVDs I have .. Ryan has some good examples of cigarette smoke). When smoking a cigarette there are 3 different types of smoke:
I started experimenting with XSI particles and then adding effects in the fx tree. This could work well if I could pin the start of the particles to the end of the cigarette (in theory this is possible using the tracker, but I'm using XSI 4.2 and the fxtree tracker crashes XSI... This is fixed in 5.0 but I'm a bit weary of upgrading at this point in production).
Currently I'm experimenting with the volume shader for cigarette smoke. You can get a good head start on this by using Holger Schonberger's preset downloadable from http://www.edharriss.com/shaders/shaders.htm. A small tip about using the volume shader technique - the smoke rises straight up until it hits the center of the object - so to control when the turbulence starts in the smoke, edit the center of the object.
For the exhaling of the smoke, I'm currently experimenting with the smoke explosion particleop.
- the smoke that rises from the tip (end) of the cigarette as it burns
- the smoke that rises from the filter of the cigarette after an inhalation (most likely this is the smoke that has been pulled through the cigarette but didn't get inhaled)
- the smoke that the smoker blows out
I started experimenting with XSI particles and then adding effects in the fx tree. This could work well if I could pin the start of the particles to the end of the cigarette (in theory this is possible using the tracker, but I'm using XSI 4.2 and the fxtree tracker crashes XSI... This is fixed in 5.0 but I'm a bit weary of upgrading at this point in production).
Currently I'm experimenting with the volume shader for cigarette smoke. You can get a good head start on this by using Holger Schonberger's preset downloadable from http://www.edharriss.com/shaders/shaders.htm. A small tip about using the volume shader technique - the smoke rises straight up until it hits the center of the object - so to control when the turbulence starts in the smoke, edit the center of the object.
For the exhaling of the smoke, I'm currently experimenting with the smoke explosion particleop.
Friday, December 23, 2005

Saturday, November 12, 2005
Animating Characters
With the characters skinned and rigged I've been animating and animating and animating!
I use a mix of animation methods, but before I do anything I act out the motion with a stop watch. Actually, before I do that I run through the motion or sequence in my mind until I can see the character performing it, then I act it out with a stop watch. This can take a long time, because I stop and write down the number of seconds for each part of the movement so I end up acting it out a number of time. Once I have the timings down, I may roughly sketch the poses in my sketchbook, or I might jump right in to the scene. I also rely a lot on reference material from the web or from real life. I spend a lot of time looking at the movies on gettyimages or the bbc motion gallery. Of course if the scene has sound, I will use the audio as reference.
I usually start with simply animating the position and orientation of the whole character, followed by the hips, then the feet, the upperbody, then the arms and head, working with poses and using next/prev keyframe to check the pose changes. When I think the poses are good I'll do a quick hiddenline render to see it in real time. I usually leave the secondary animation until all the primary animation is done and things are looking good.
I set the fcurves to be created linear by default rather than spline. Of course for things that absolutely need spline curves, I'll switch the curves back to spline immediately. The canary's swing, for example, absolutely needs a spline curve. For all other curves I will decide at the tweaking stage how to edit the curves. For some I will manually set keys to control the ease-in and -outs, for others I'll just switch the curves to spline.
The most unusual thing I've discovered recently is that birds walk in a backwards human tip toe. Take a look at any of the bird quicktime movies on gettyimages and play them backwards, you'll see what I mean.
Rather than re-write what has already been written about animation by those more qualified than myself, here are a number of valuable online animation references:
Character Animation articles from Siggraph
Spline Doctors blog
Keith Lango (blog, short films and tutorials)
Shaun Freeman (collection of animation tips from various sources)
Carlos Baena (collection of animation tips from various sources)
3D Ark
The other things that help me are reference books and videos! I've got the Illusion of Life and the Animator's Survival kit within hand's reach. But nothing starts a good day of animation like watching an animated short (I keep Warner Bros, Pixar, Aardman, and Rocky & Bullwinkle DVDs and tapes close by).
I use a mix of animation methods, but before I do anything I act out the motion with a stop watch. Actually, before I do that I run through the motion or sequence in my mind until I can see the character performing it, then I act it out with a stop watch. This can take a long time, because I stop and write down the number of seconds for each part of the movement so I end up acting it out a number of time. Once I have the timings down, I may roughly sketch the poses in my sketchbook, or I might jump right in to the scene. I also rely a lot on reference material from the web or from real life. I spend a lot of time looking at the movies on gettyimages or the bbc motion gallery. Of course if the scene has sound, I will use the audio as reference.
I usually start with simply animating the position and orientation of the whole character, followed by the hips, then the feet, the upperbody, then the arms and head, working with poses and using next/prev keyframe to check the pose changes. When I think the poses are good I'll do a quick hiddenline render to see it in real time. I usually leave the secondary animation until all the primary animation is done and things are looking good.
I set the fcurves to be created linear by default rather than spline. Of course for things that absolutely need spline curves, I'll switch the curves back to spline immediately. The canary's swing, for example, absolutely needs a spline curve. For all other curves I will decide at the tweaking stage how to edit the curves. For some I will manually set keys to control the ease-in and -outs, for others I'll just switch the curves to spline.
The most unusual thing I've discovered recently is that birds walk in a backwards human tip toe. Take a look at any of the bird quicktime movies on gettyimages and play them backwards, you'll see what I mean.
Rather than re-write what has already been written about animation by those more qualified than myself, here are a number of valuable online animation references:
Character Animation articles from Siggraph
Spline Doctors blog
Keith Lango (blog, short films and tutorials)
Shaun Freeman (collection of animation tips from various sources)
Carlos Baena (collection of animation tips from various sources)
3D Ark
The other things that help me are reference books and videos! I've got the Illusion of Life and the Animator's Survival kit within hand's reach. But nothing starts a good day of animation like watching an animated short (I keep Warner Bros, Pixar, Aardman, and Rocky & Bullwinkle DVDs and tapes close by).
Wednesday, October 26, 2005
Enveloping (skinning) tips
> use the default values for the envelope (2 skeleton objects and distance based);
> apply a smooth (leave the default values);
> animate or move deformers to see where the weighting needs to be improved;
> sometimes it will be easier to select the points and reassign locally to the deformers they should be assigned to;
> painting weights works well for large area revisions but is a bit difficult to control the accuracy for smaller areas;
> for the final tweaks you may need to edit individual point weighting, selecting a bone with the weight editor open and scrolling through each point works well (although a bit tedious);
> when you are happy with the enveloping, freeze the envelope modifications and save a preset (from the Envelope_Weight property page, located under the Clusters > EnvelopeWeightCls);
> make sure to occasionally check a render region while you are enveloping, or render a short animation sequence, creases in the skinning may be seen in a mental ray render that you don't see in hidden line or shaded.
If you need to add a bone or other deformer to the rig / or if you need to add points to the geometry:
> save a preset of the envelope weights;
> return to the default skeleton pose;
> mute the envelope;
> add the deformer or the points to the geometry;
> set the envelope (leave "automatically reassign envelope" toggled off);
> turn the envelope back on;
> load the preset;
> reassign the points near the added deformer as necessary or in the case of adding points to the geometry reassign the newly added points to the nearest deformers.
> apply a smooth (leave the default values);
> animate or move deformers to see where the weighting needs to be improved;
> sometimes it will be easier to select the points and reassign locally to the deformers they should be assigned to;
> painting weights works well for large area revisions but is a bit difficult to control the accuracy for smaller areas;
> for the final tweaks you may need to edit individual point weighting, selecting a bone with the weight editor open and scrolling through each point works well (although a bit tedious);
> when you are happy with the enveloping, freeze the envelope modifications and save a preset (from the Envelope_Weight property page, located under the Clusters > EnvelopeWeightCls);
> make sure to occasionally check a render region while you are enveloping, or render a short animation sequence, creases in the skinning may be seen in a mental ray render that you don't see in hidden line or shaded.
If you need to add a bone or other deformer to the rig / or if you need to add points to the geometry:
> save a preset of the envelope weights;
> return to the default skeleton pose;
> mute the envelope;
> add the deformer or the points to the geometry;
> set the envelope (leave "automatically reassign envelope" toggled off);
> turn the envelope back on;
> load the preset;
> reassign the points near the added deformer as necessary or in the case of adding points to the geometry reassign the newly added points to the nearest deformers.
Tuesday, October 25, 2005
Preparing the rig and the character's geometry for skinning/enveloping
- create a shelf of tools or a synoptic view to make it easy to select the rig objects;
- test the skeleton/rig and its hierarchy to make sure it moves the way you need it to;
- make sure all bone joints are slightly bent (to ensure the preferred angles are created correctly);
- make sure the shoulder bones extend slightly past the shoulder (to avoid enveloping problems in the armpits);
- make a group of all the deformers (it will be easier to pick in one shot rather than trying to pick each deformer);
- select the skeleton hierarchy in branch mode and set neutral pose (this will zero out the SRT values and make it easier to manipulate);
- open up the kinematics ppg for each bone and make sure the order of rotation is set correctly;
- add transform setups to the objects so they'll switch automatically to the correct transform tool on selection (remember to switch to additive mode for rotations);
- store a skeleton pose of the rig in its default pose (make a reset pose button on the toolbar/synoptic view)
- make sure that the geometry has enough points where the joints will bend;
- freeze the modeling of the geometry;
- test the skeleton/rig and its hierarchy to make sure it moves the way you need it to;
- make sure all bone joints are slightly bent (to ensure the preferred angles are created correctly);
- make sure the shoulder bones extend slightly past the shoulder (to avoid enveloping problems in the armpits);
- make a group of all the deformers (it will be easier to pick in one shot rather than trying to pick each deformer);
- select the skeleton hierarchy in branch mode and set neutral pose (this will zero out the SRT values and make it easier to manipulate);
- open up the kinematics ppg for each bone and make sure the order of rotation is set correctly;
- add transform setups to the objects so they'll switch automatically to the correct transform tool on selection (remember to switch to additive mode for rotations);
- store a skeleton pose of the rig in its default pose (make a reset pose button on the toolbar/synoptic view)
- make sure that the geometry has enough points where the joints will bend;
- freeze the modeling of the geometry;
Monday, October 24, 2005
Create a Skeleton Rig from the Biped Guide
Using a guide to create a rig speeds up the process of building skeletons.
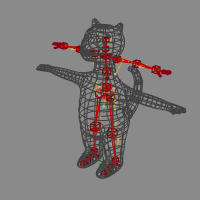
1. Start by loading the model you want to rig.
2. Get the Biped Guide (Animate > Create > Character> Biped Guide).
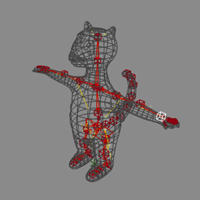
3. Translate the cubes to best fit the skeleton into the model.
4. Duplicate the spine cube (at least 3 or more times) to create a tail. (Or create the tail or other additional bones after you've generated the rig from the guide).
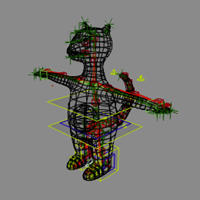 5. Select the guide and generate the rig from the guide (Animate > Create > Character > Rig from Biped Guide. Choose Quaternion for the spine, but skeleton for the neck. I find that non-symmetrical manipulation of arms works better (i.e. both arms have positive scaling).
6. Add bones as necessary. I use 3 bone arms (the extra bone works as the elbow). I also use an upper jaw bone, that makes enveloping the head a bit easy and is a good holder (parent) for the eye and eyebrow nulls.
There are a few things to avoid when transforming the guide:
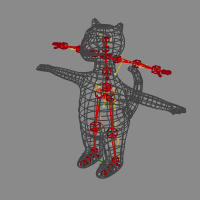
1. Start by loading the model you want to rig.
2. Get the Biped Guide (Animate > Create > Character> Biped Guide).
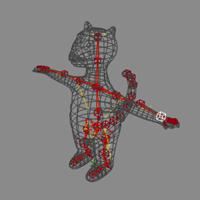
3. Translate the cubes to best fit the skeleton into the model.
4. Duplicate the spine cube (at least 3 or more times) to create a tail. (Or create the tail or other additional bones after you've generated the rig from the guide).
 5. Select the guide and generate the rig from the guide (Animate > Create > Character > Rig from Biped Guide. Choose Quaternion for the spine, but skeleton for the neck. I find that non-symmetrical manipulation of arms works better (i.e. both arms have positive scaling).
6. Add bones as necessary. I use 3 bone arms (the extra bone works as the elbow). I also use an upper jaw bone, that makes enveloping the head a bit easy and is a good holder (parent) for the eye and eyebrow nulls.
There are a few things to avoid when transforming the guide:
- Don't move the ribcage start cube in front of the rib cage end cube;
- Don't delete bones in the guide, wait until after you've created the rig and then delete them in rig;
Subscribe to:
Posts (Atom)


