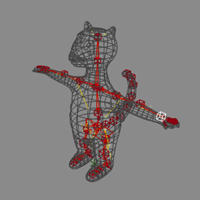
> use the default values for the envelope (2 skeleton objects and distance based);
> apply a smooth (leave the default values);
> animate or move deformers to see where the weighting needs to be improved;
> sometimes it will be easier to select the points and reassign locally to the deformers they should be assigned to;
> painting weights works well for large area revisions but is a bit difficult to control the accuracy for smaller areas;
> for the final tweaks you may need to edit individual point weighting, selecting a bone with the weight editor open and scrolling through each point works well (although a bit tedious);
> when you are happy with the enveloping, freeze the envelope modifications and save a preset (from the Envelope_Weight property page, located under the Clusters > EnvelopeWeightCls);
> make sure to occasionally check a render region while you are enveloping, or render a short animation sequence, creases in the skinning may be seen in a mental ray render that you don't see in hidden line or shaded.
If you need to add a bone or other deformer to the rig / or if you need to add points to the geometry:
> save a preset of the envelope weights;
> return to the default skeleton pose;
> mute the envelope;
> add the deformer or the points to the geometry;
> set the envelope (leave "automatically reassign envelope" toggled off);
> turn the envelope back on;
> load the preset;
> reassign the points near the added deformer as necessary or in the case of adding points to the geometry reassign the newly added points to the nearest deformers.
Wednesday, October 26, 2005
Tuesday, October 25, 2005
Preparing the rig and the character's geometry for skinning/enveloping
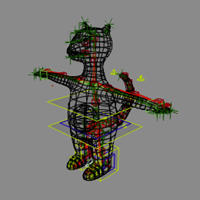
- create a shelf of tools or a synoptic view to make it easy to select the rig objects;
- test the skeleton/rig and its hierarchy to make sure it moves the way you need it to;
- make sure all bone joints are slightly bent (to ensure the preferred angles are created correctly);
- make sure the shoulder bones extend slightly past the shoulder (to avoid enveloping problems in the armpits);
- make a group of all the deformers (it will be easier to pick in one shot rather than trying to pick each deformer);
- select the skeleton hierarchy in branch mode and set neutral pose (this will zero out the SRT values and make it easier to manipulate);
- open up the kinematics ppg for each bone and make sure the order of rotation is set correctly;
- add transform setups to the objects so they'll switch automatically to the correct transform tool on selection (remember to switch to additive mode for rotations);
- store a skeleton pose of the rig in its default pose (make a reset pose button on the toolbar/synoptic view)
- make sure that the geometry has enough points where the joints will bend;
- freeze the modeling of the geometry;
Monday, October 24, 2005
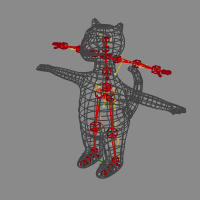
Create a Skeleton Rig from the Biped Guide
Using a guide to create a rig speeds up the process of building skeletons.

1. Start by loading the model you want to rig.
2. Get the Biped Guide (Animate > Create > Character> Biped Guide).
3. Translate the cubes to best fit the skeleton into the model.
4. Duplicate the spine cube (at least 3 or more times) to create a tail. (Or create the tail or other additional bones after you've generated the rig from the guide).
 5. Select the guide and generate the rig from the guide (Animate > Create > Character > Rig from Biped Guide. Choose Quaternion for the spine, but skeleton for the neck. I find that non-symmetrical manipulation of arms works better (i.e. both arms have positive scaling).
6. Add bones as necessary. I use 3 bone arms (the extra bone works as the elbow). I also use an upper jaw bone, that makes enveloping the head a bit easy and is a good holder (parent) for the eye and eyebrow nulls.
There are a few things to avoid when transforming the guide:
1. Start by loading the model you want to rig.
2. Get the Biped Guide (Animate > Create > Character> Biped Guide).

3. Translate the cubes to best fit the skeleton into the model.
4. Duplicate the spine cube (at least 3 or more times) to create a tail. (Or create the tail or other additional bones after you've generated the rig from the guide).
 5. Select the guide and generate the rig from the guide (Animate > Create > Character > Rig from Biped Guide. Choose Quaternion for the spine, but skeleton for the neck. I find that non-symmetrical manipulation of arms works better (i.e. both arms have positive scaling).
6. Add bones as necessary. I use 3 bone arms (the extra bone works as the elbow). I also use an upper jaw bone, that makes enveloping the head a bit easy and is a good holder (parent) for the eye and eyebrow nulls.
There are a few things to avoid when transforming the guide:
- Don't move the ribcage start cube in front of the rib cage end cube;
- Don't delete bones in the guide, wait until after you've created the rig and then delete them in rig;
Monday, October 17, 2005
modeling a character from a sphere
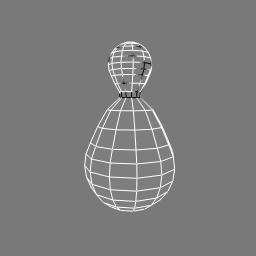
How to make a character from a sphere:
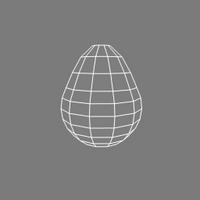
1. Get a polygonal sphere and increase the subdivisions to 12, 12
2. Translate components (points, edges or polygons) to give it an egg like shape
3. Select the top polygons and delete them
4. Freeze the sphere and duplicate it to make the head
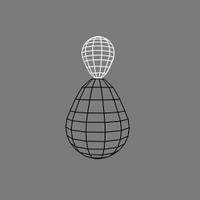
5. Rotate, translate and scale the duplicate above the body
6. Select the bottom row of points and scale them so the neck part of the head matches the neck part of the body.

7. Select both the head and the body and choose, Create > polymesh > blend, to merge the head and the body into one object, > toggle off blend, this will merge the points along the neck seam.
8. Select the polymsh and freeze modeling, you might want to rename the object to something more intuitiven than polymsh.
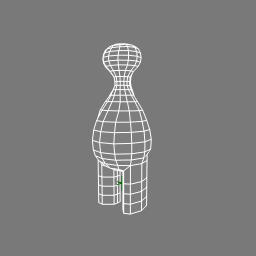
 Add the legs, feet, arms, snout, ears
9. Select polygons on the bottom of the body where the body parts will be attached.
10. Extrude along axis, increase the length and the subdivisions to make the body parts.
11. Transform the components as necessary (i.e. translate, scale and rotate, points, edges or polygons to better shape the body parts).
 Add the tail
12. Draw a curve in the shape of the tail
13. Select polygons on the body where the tail will extend from
14. Extrude along curve, pick the curve, increase the subdivisions, decrease the scale per subdivision, toggle on AutoRotate
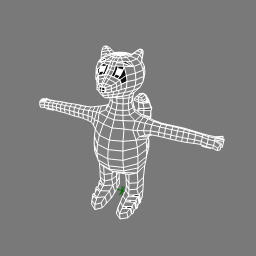
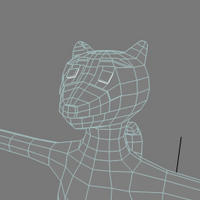 Add the eyes, nose and stripes
15. Select the polygons where the eyes, nose and stripes will appear and extrude them. In these cases the length will be very small.
16. Select the edges along the border of the eyes, nose and stripes and choose Modify > Component > Set Edge Crease Value, increase the value. This makes the nose, eyes or stripe look more like a blob of plasticine added to the model.
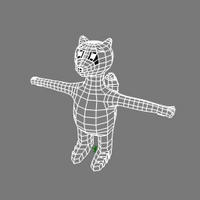 Colour the eyes, nose, stripes and paws
17. Select the polygons that make up the eyes, nose, stripes and paws and create clusters from them.
18. Select the clusters and apply materials to them.
19. Use the + key to increase the subdivisions.
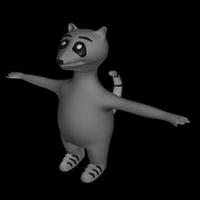
20. Switch to shaded view to double check the result.

1. Get a polygonal sphere and increase the subdivisions to 12, 12
2. Translate components (points, edges or polygons) to give it an egg like shape
3. Select the top polygons and delete them
4. Freeze the sphere and duplicate it to make the head

5. Rotate, translate and scale the duplicate above the body
6. Select the bottom row of points and scale them so the neck part of the head matches the neck part of the body.
7. Select both the head and the body and choose, Create > polymesh > blend, to merge the head and the body into one object, > toggle off blend, this will merge the points along the neck seam.
8. Select the polymsh and freeze modeling, you might want to rename the object to something more intuitiven than polymsh.
 Add the legs, feet, arms, snout, ears
9. Select polygons on the bottom of the body where the body parts will be attached.
10. Extrude along axis, increase the length and the subdivisions to make the body parts.
11. Transform the components as necessary (i.e. translate, scale and rotate, points, edges or polygons to better shape the body parts).
 Add the tail
12. Draw a curve in the shape of the tail
13. Select polygons on the body where the tail will extend from
14. Extrude along curve, pick the curve, increase the subdivisions, decrease the scale per subdivision, toggle on AutoRotate
 Add the eyes, nose and stripes
15. Select the polygons where the eyes, nose and stripes will appear and extrude them. In these cases the length will be very small.
16. Select the edges along the border of the eyes, nose and stripes and choose Modify > Component > Set Edge Crease Value, increase the value. This makes the nose, eyes or stripe look more like a blob of plasticine added to the model.
 Colour the eyes, nose, stripes and paws
17. Select the polygons that make up the eyes, nose, stripes and paws and create clusters from them.
18. Select the clusters and apply materials to them.
19. Use the + key to increase the subdivisions.

20. Switch to shaded view to double check the result.
Saturday, October 08, 2005
re-applying fcurve action tip
I had stored the tiger's animation for the first sequence into an action. I needed to tweak it a bit (see that the tiger's right foot is going through the floor), so I reapplied it using Actions > Apply > Action. But doing so, overwrote the following animation (sequence 2 and 3).
Today I was happy to discover that Actions > Apply > Paste Action ... allows me to paste the action from sequence 1 back onto the tiger and the animation from sequence 2 and 3 remain in tact (setting the target to the same model as the source).
The only caveat will be to be careful when storing the tweaked animation for sequence 1, not to remove the animation via the store command, since doing so will remove all the animation (not just between the start and end frames of the store action command).
Subscribe to:
Posts (Atom)

