Friday, December 23, 2005

happy holidays


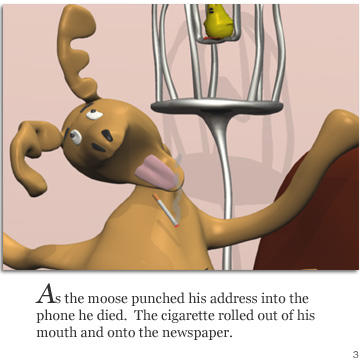
more smoking moose stuff to come in the new year....

Saturday, November 12, 2005

Animating Characters

With the characters skinned and rigged I've been animating and animating and animating!

I use a mix of animation methods, but before I do anything I act out the motion with a stop watch. Actually, before I do that I run through the motion or sequence in my mind until I can see the character performing it, then I act it out with a stop watch. This can take a long time, because I stop and write down the number of seconds for each part of the movement so I end up acting it out a number of time. Once I have the timings down, I may roughly sketch the poses in my sketchbook, or I might jump right in to the scene. I also rely a lot on reference material from the web or from real life. I spend a lot of time looking at the movies on gettyimages or the bbc motion gallery. Of course if the scene has sound, I will use the audio as reference.

I usually start with simply animating the position and orientation of the whole character, followed by the hips, then the feet, the upperbody, then the arms and head, working with poses and using next/prev keyframe to check the pose changes. When I think the poses are good I'll do a quick hiddenline render to see it in real time. I usually leave the secondary animation until all the primary animation is done and things are looking good.

I set the fcurves to be created linear by default rather than spline. Of course for things that absolutely need spline curves, I'll switch the curves back to spline immediately. The canary's swing, for example, absolutely needs a spline curve. For all other curves I will decide at the tweaking stage how to edit the curves. For some I will manually set keys to control the ease-in and -outs, for others I'll just switch the curves to spline.

The most unusual thing I've discovered recently is that birds walk in a backwards human tip toe. Take a look at any of the bird quicktime movies on gettyimages and play them backwards, you'll see what I mean.

Rather than re-write what has already been written about animation by those more qualified than myself, here are a number of valuable online animation references:

Character Animation articles from Siggraph

Spline Doctors blog
Keith Lango (blog, short films and tutorials)
Shaun Freeman (collection of animation tips from various sources)
Carlos Baena (collection of animation tips from various sources)
3D Ark


The other things that help me are reference books and videos! I've got the Illusion of Life and the Animator's Survival kit within hand's reach. But nothing starts a good day of animation like watching an animated short (I keep Warner Bros, Pixar, Aardman, and Rocky & Bullwinkle DVDs and tapes close by).

Wednesday, October 26, 2005

Enveloping (skinning) tips

> use the default values for the envelope (2 skeleton objects and distance based);
> apply a smooth (leave the default values);
> animate or move deformers to see where the weighting needs to be improved;
> sometimes it will be easier to select the points and reassign locally to the deformers they should be assigned to;
> painting weights works well for large area revisions but is a bit difficult to control the accuracy for smaller areas;
> for the final tweaks you may need to edit individual point weighting, selecting a bone with the weight editor open and scrolling through each point works well (although a bit tedious);
> when you are happy with the enveloping, freeze the envelope modifications and save a preset (from the Envelope_Weight property page, located under the Clusters > EnvelopeWeightCls);
> make sure to occasionally check a render region while you are enveloping, or render a short animation sequence, creases in the skinning may be seen in a mental ray render that you don't see in hidden line or shaded.

If you need to add a bone or other deformer to the rig / or if you need to add points to the geometry:
> save a preset of the envelope weights;
> return to the default skeleton pose;
> mute the envelope;
> add the deformer or the points to the geometry;
> set the envelope (leave "automatically reassign envelope" toggled off);
> turn the envelope back on;
> load the preset;
> reassign the points near the added deformer as necessary or in the case of adding points to the geometry reassign the newly added points to the nearest deformers.

Tuesday, October 25, 2005

Preparing the rig and the character's geometry for skinning/enveloping

- create a shelf of tools or a synoptic view to make it easy to select the rig objects;
- test the skeleton/rig and its hierarchy to make sure it moves the way you need it to;
- make sure all bone joints are slightly bent (to ensure the preferred angles are created correctly);
- make sure the shoulder bones extend slightly past the shoulder (to avoid enveloping problems in the armpits);
- make a group of all the deformers (it will be easier to pick in one shot rather than trying to pick each deformer);
- select the skeleton hierarchy in branch mode and set neutral pose (this will zero out the SRT values and make it easier to manipulate);
- open up the kinematics ppg for each bone and make sure the order of rotation is set correctly;
- add transform setups to the objects so they'll switch automatically to the correct transform tool on selection (remember to switch to additive mode for rotations);
- store a skeleton pose of the rig in its default pose (make a reset pose button on the toolbar/synoptic view)
- make sure that the geometry has enough points where the joints will bend;
- freeze the modeling of the geometry;

Monday, October 24, 2005

Create a Skeleton Rig from the Biped Guide

Using a guide to create a rig speeds up the process of building skeletons.


1. Start by loading the model you want to rig.


2. Get the Biped Guide (Animate > Create > Character> Biped Guide).


3. Translate the cubes to best fit the skeleton into the model.

4. Duplicate the spine cube (at least 3 or more times) to create a tail. (Or create the tail or other additional bones after you've generated the rig from the guide).


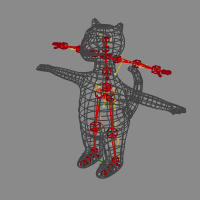
5. Select the guide and generate the rig from the guide (Animate > Create > Character > Rig from Biped Guide. Choose Quaternion for the spine, but skeleton for the neck. I find that non-symmetrical manipulation of arms works better (i.e. both arms have positive scaling).

6. Add bones as necessary. I use 3 bone arms (the extra bone works as the elbow). I also use an upper jaw bone, that makes enveloping the head a bit easy and is a good holder (parent) for the eye and eyebrow nulls.


There are a few things to avoid when transforming the guide:
  • Don't move the ribcage start cube in front of the rib cage end cube;
  • Don't delete bones in the guide, wait until after you've created the rig and then delete them in rig;

Monday, October 17, 2005

modeling a character from a sphere

How to make a character from a sphere:


1. Get a polygonal sphere and increase the subdivisions to 12, 12

2. Translate components (points, edges or polygons) to give it an egg like shape


3. Select the top polygons and delete them

4. Freeze the sphere and duplicate it to make the head


5.
Rotate, translate and scale the duplicate above the body

6. Select the bottom row of points and scale them so the neck part of the head matches the neck part of the body.


7. Select both the head and the body and choose, Create > polymesh > blend, to merge the head and the body into one object, > toggle off blend, this will merge the points along the neck seam.


8. Select the polymsh and freeze modeling, you might want to rename the object to something more intuitiven than polymsh.


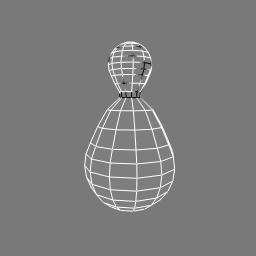
Add the legs, feet, arms, snout, ears
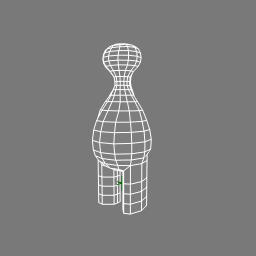
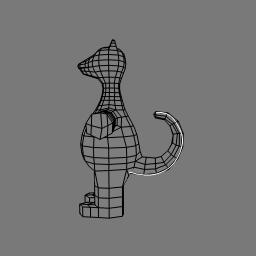
9. Select polygons on the bottom of the body where the body parts will be attached.

10. Extrude along axis, increase the length and the subdivisions to make the body parts.

11. Transform the components as necessary (i.e. translate, scale and rotate, points, edges or polygons to better shape the body parts).

Add the tail

12. Draw a curve in the shape of the tail

13. Select polygons on the body where the tail will extend from

14. Extrude along curve, pick the curve, increase the subdivisions, decrease the scale per subdivision, toggle on AutoRotate


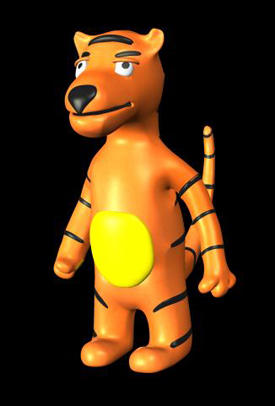
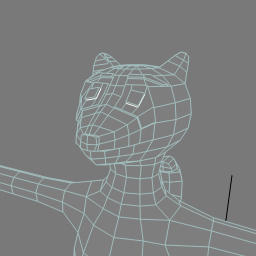
Add the eyes, nose and stripes

15. Select the polygons where the eyes, nose and stripes will appear and extrude them. In these cases the length will be very small.

16. Select the edges along the border of the eyes, nose and stripes and choose Modify > Component > Set Edge Crease Value, increase the value. This makes the nose, eyes or stripe look more like a blob of plasticine added to the model.


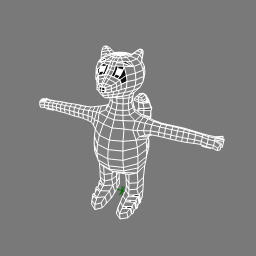
Colour the eyes, nose, stripes and paws

17. Select the polygons that make up the eyes, nose, stripes and paws and create clusters from them.

18. Select the clusters and apply materials to them.

19. Use the + key to increase the subdivisions.


20. Switch to shaded view to double check the result.

Saturday, October 08, 2005

re-applying fcurve action tip

I had stored the tiger's animation for the first sequence into an action. I needed to tweak it a bit (see that the tiger's right foot is going through the floor), so I reapplied it using Actions > Apply > Action. But doing so, overwrote the following animation (sequence 2 and 3).

Today I was happy to discover that Actions > Apply > Paste Action ... allows me to paste the action from sequence 1 back onto the tiger and the animation from sequence 2 and 3 remain in tact (setting the target to the same model as the source).

The only caveat will be to be careful when storing the tweaked animation for sequence 1, not to remove the animation via the store command, since doing so will remove all the animation (not just between the start and end frames of the store action command).

Monday, September 26, 2005

another tip on adding deformers to an enveloped character

I've often forgotten to add the deformers to the envelope before trying to reassign points, so I thought it would be good to add this tip to the blog (it was posted on the xsi discussion list recently):

"If you want to add some more influences to an envelope, just select the
geometry, then click the set envelope button again. The local re-assign
button only works for assigning a point to objects already set as
influences.

-Noodles"

Remember not to toggle on "Automatically Reassign Envelope", if you've adjusted the weighting of the points for the rest of the envelope.

Friday, September 02, 2005

Animating Shapes on top of Envelopes

I'm trying to use shape animation to animate the eyeballs of the characters. Here are a couple of things to keep in mind:

1. Only point clusters can be used when animating shapes (nothing happens if you try to use polygon clusters)
2. Make sure to switch to Secondary Shape Modeling Mode before saving any shapes.
3. Turn on Model > Modify > Component > Relative Mode.
4. Make sure Mixed Weight Mode is turned on in the Shape menu.
5. Make sure Local Relative Mode is turned on in the Shape
6. Rename the Shape Key and the proxy parameter shape weight after EACH savekey.
7. If the shapes shoot off or otherwise go wacky, try turning off Normalize Overlap Weights in the Cluster Shape Combiner Property page and/or setting the Overlap Weight to zero.

The last unsolvable problem that I have is with the shapes going "wacky". The weird thing is that everything works fine, I can animate the shapes and render, but when I save and reload the scene, the shapes are no longer shaped the way they were when created and animated. I've given up on using shape animation for the moose and the tiger.

For the moose I just added two nulls, children of the upper jaw bone, and enveloped points to them. I'm using the nulls to control the pupils transforms. For the tiger, I've just added geometry, again children of the upper jaw, and I'm animating their transform (in reference mode... reference to a flat polygon cluster on the eyeball).

I will need to use Shape animation on the canary when it eats the tiger ... hopefully that will work better.

Wednesday, August 31, 2005

Adding deformers to transformed envelopes


Yikes. I wanted to add 3 nulls to the Tiger's skeleton so I could animate his nostrils when he sniffs his stripe. When I assigned the nostrils' points to the added deformer nulls the points shot off into the distance.

A search on the xsi discussion group on softimage.com confirmed the issue was related to the reference pose and it having been transformed. There are a few different workarounds listed in the postings. Here is a new variation that worked for me.
1.  From the Weight Editor ppg, save the envelope
2. Select the points you want to assign to the new deformer and assign them to any OTHER deformer
3. Select the Envelope Operator and Freeze
4. Select the envelope geometry and set envelope
5. Load the saved preset.


Thursday, August 04, 2005

object to cluster constraint woes - Skeleton/Envelope Joy

Last night I was struggling with yet another object to cluster constraint. Problems start to happen when I need to change the position / orientation of the object .. i.e. when the moose dies, the cigarette in his mouth (which is constrained to a cluster on his tongue) rolls off the tongue and onto the newspaper. Animating the blend or the activeness of the constraint works (in that it blends or turns it on or off) but I can't get the position and orientation correct, there is always a jump, or I can't place the thing in the place where I want it to be.

This was also happening with with the nose and eyebrows of the tiger (and the moose too). For these, I added polygons to the polygonal object and used crease control. This wouldn't work for the cigarette, it couldn't really be part of the tongue and it needs to roll off it.

I had the same problem with the stripe on the forehead of the tiger, which I solved by adding a 2 bone skeleton chain and enveloping the stripe to the two bones. In this case, this is the perfect solution since the stripe needs to bend when the tiger pulls it off and then needs to be straightened out when he sniffs it.

Yesterday, I also used this chain and envelope technique for the Canary's cigarette, which previously had been constrained to a cluster with which I was struggling with the offsets to get the correct orientation and position of the cigarette when the canary picks it out of the package. This is a great solution here, since I can now animate the length of the second bone of the cigarette as it is smoked.

I decided today to use the same Chain and Envelope technique for the Moose's cigarette. It works marvelously. It is so much easier to control the position and orientation of the cigarette just by animating the root of the skeleton. The chain and envelope are children of the tongue and move perfectly with it as the moose chokes to death.

I'm sure there is no problem with the object to cluster constraint in itself. The problems occur when I try to animate offsets / activeness / blend. I'm happy that skeletons and envelopes are working fine for these situations!

Tuesday, August 02, 2005

Quick Renders: Create a new pass and lower the AA rate

I had been using the Camera > Start Capture with the viewport display set to Hidden Line, to render quick previews of the animation I was working on. However I realized that setting up a pass with the render engine set to Hidden Line or OpenGL was just as quick. In addition, Chinny (a colleague at work) showed me that when rendering Hidden Line or OpenGL, the maximum anti-aliasing sample level made absolutely no difference in the quality of the render, setting it to zero, the render was quite fast and the image quite good! Perfect for viewing the animation.

Sunday, July 17, 2005

back at it

I have started to work again on the film. Here are a few things that I've learned recently about XSI while working on the tiger character.

The tiger has body parts that I wanted to look like blobs of plasticine stuck onto his body, such as his belly, nose, eyes, eyebrows and stripes. Originally I had created these as separate parts and constrained them to clusters on the tiger's body. However, when I was animating the tiger, the parts started to flip around and weren't controllable. Instead I added polygons to the polymesh body, then selected the edges around the "bulge", used Model > Modify > Component > Set edge/vertex crease value and set it to 2. This worked quite well.


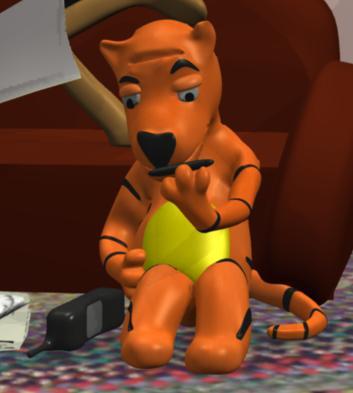
The eyelids are still separate pieces of geometry, but rather than constraining them to a cluster on the polymesh, I've added nulls at the top of the eyes and have made the nulls children of the head bone. I moved the center of the eyelid geometry to the top of the eyelid and am animated the scaling in Y to open and close the eyelids.
The eyeballs are part of the polymesh using the crease value as noted above. These will be animated using Shape Keys, without going through the mixer. A couple of things you need to know about this.

First the clusters need to be point clusters and not polygons.

Second, the first Shape you save should be stored rather than saved (Animate > Deform > Shape > Store Shape Key). This is to create a Reference shape that that the others will be compared against. Then save the subsequent shapes (Animate > Deform > Shape > Save Shape Key).

Third, if you're going to use the Custom Property sliders to animate the shapes, you should rename the parameter names at the time you create the ShapeKeys. First rename the Shape Key when you create it and then open the Custom Parameter Set (called Shape Weights and located under the object, pin it open to keep up open while you create other shapes). To rename the parameter, right click on the animation divot and choose "Edit Parameter Definition", change the name.
Be aware that Skeleton > Create Spine, uses a scripted operator to control the upvector parameters on the vertebrae. If you use this (or Create Tail) do not use Remove Animation > All / any type. If you do the upvector constraints won't work any more and the torso of your character won't rotate correctly any more. I didn't find a way to reconnect the scripted operator, so I saved the envelope weights as a preset, re-created the spine, making sure I used the same names and then applied the envelope preset.